Spray painting motorcycle parts at home can give old, scratched or faded components a fresh look without spending heavily on professional painting. The key, however, is surface preparation. Good spray paint applied to a poorly prepared surface will still peel, crack or look uneven.
For a bike, you may want to repaint body panels, brackets, crash guards, metal accessories, wheels or other cosmetic parts. The correct paint depends on the material and how much heat, weather, abrasion or chemical exposure the part receives.
Quick Recommendations
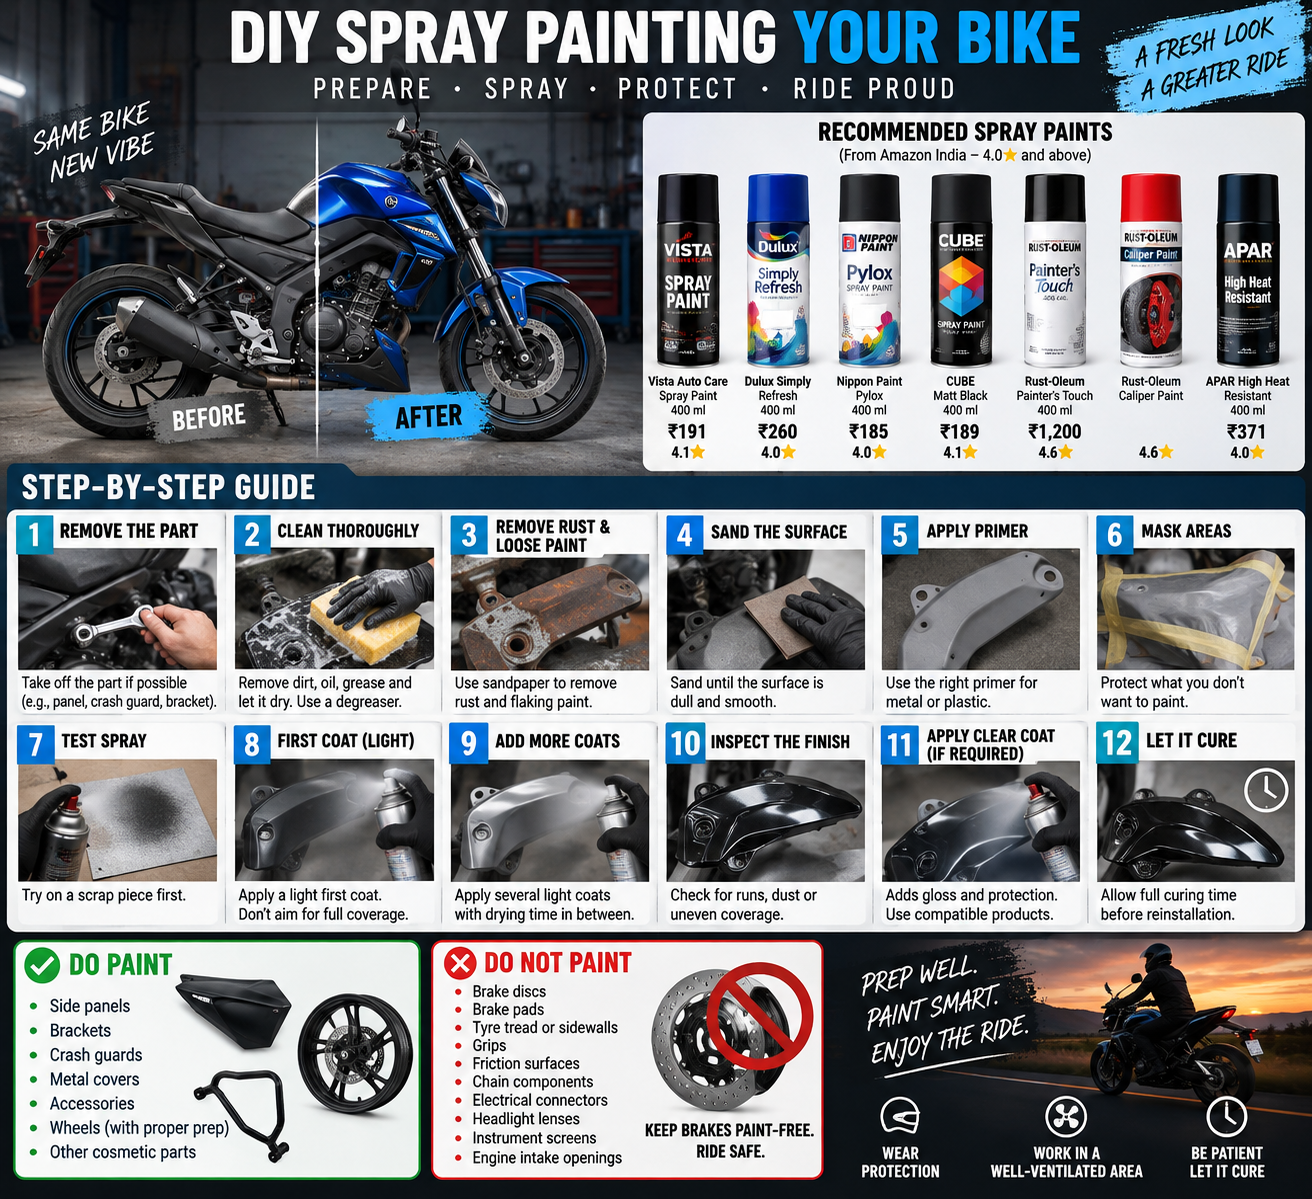
- Vista Auto Care Spray Paint 400 ml – Black Glossy — ₹191, 4.1★ — a straightforward option for metal and other suitable surfaces.
- Dulux Simply Refresh Spray Paint 400 ml – White — ₹260, 4.0★ — suitable for multiple surfaces including metal, plastic and bike applications.
- Nippon Paint Pylox Spray Paint 400 ml – Glossy Black — ₹185, 4.0★ — useful for DIY metal, plastic and automotive applications.
- CUBE Matt Black Spray Paint 400 ml — ₹189, 4.1★ — useful when you want a matt-black appearance.
- Rust-Oleum Painter’s Touch Acrylic Spray Paint – Matte Flat Black — ₹1,200, 4.6★ — a higher-priced option with a strong customer rating.
- Rust-Oleum Automotive Caliper Spray Paint – Red — 4.6★ — specifically intended for automotive caliper applications rather than ordinary bodywork.
- APAR High Heat Resistant Spray Paint – Matt Black — ₹371, 4.0★ — intended for high-temperature applications such as silencers.
Prices shown are from the supplied Amazon listing and can change.
Quick Comparison
| Product | Price | Rating | Suitable For | Main Advantage |
|---|---|---|---|---|
| Vista Auto Care 400 ml | ₹191 | 4.1★ | Metal, wood, suitable DIY surfaces | Affordable gloss option |
| Dulux Simply Refresh 400 ml | ₹260 | 4.0★ | Metal, plastic, cars and bikes | Multi-surface use |
| Nippon Paint Pylox 400 ml | ₹185 | 4.0★ | Metal, plastic, glass and DIY work | Low-odour, quick-drying formulation |
| CUBE Matt Black 400 ml | ₹189 | 4.1★ | Metal, plastic, car and bike parts | Matt-black finish |
| Rust-Oleum Painter’s Touch | ₹1,200 | 4.6★ | General DIY surfaces | Strong customer rating |
| APAR High Heat Resistant | ₹371 | 4.0★ | Silencer and high-temperature parts | Designed for high heat |
Before You Start
Spray painting works best when the part is removed from the motorcycle.
If possible, remove the:
- Side panel
- Bracket
- Crash guard
- Metal cover
- Accessory
- Other removable component
Painting a removed part gives you much better access and reduces the chance of getting overspray on the motorcycle.
For parts that cannot easily be removed, carefully mask everything around them.
Step 1: Clean the Part
Start with a thorough cleaning.
Motorcycle parts can have:
- Road dirt
- Oil
- Grease
- Wax
- Silicone
- Chain lubricant
- Brake dust
- Fingerprints
Paint will not adhere properly to a contaminated surface.
Wash the part first and let it dry completely. Then use a suitable degreaser or surface cleaner to remove remaining oil and grease.
After cleaning, avoid touching the surface with bare hands.
Step 2: Remove Rust and Loose Paint
Inspect the part carefully.
If you find rust, peeling paint or loose coating, remove it before painting.
Use sandpaper or another suitable abrasive to remove:
- Surface rust
- Flaking paint
- Loose coating
- Oxidised areas
- Rough edges
Do not simply spray new paint over active rust and expect it to stop corrosion.
For heavily corroded components, the rust needs to be treated properly before painting.
Step 3: Sand the Surface
Sanding is one of the most important parts of the job.
If the existing paint is still firmly attached, you don’t necessarily need to remove every layer. Instead, sand the surface until the glossy finish becomes uniformly dull.
This gives the primer and paint a better surface to grip.
Pay particular attention to:
- Scratches
- Edges
- Corners
- Peeling areas
- Previously repaired sections
After sanding, remove all dust.
Step 4: Repair Deep Scratches
Spray paint won’t hide deep scratches or dents.
If you can easily feel a deep scratch with your finger, it may still be visible after painting.
Repair the damaged area first, then sand it smooth.
The smoother the surface is before painting, the better the final result will look.
Step 5: Apply Primer
Primer helps create a consistent surface and can improve adhesion.
Use a primer appropriate for the material.
Metal
Use a suitable metal primer, especially when bare metal has been exposed.
Plastic
Plastic can require an adhesion promoter or plastic-compatible primer.
Don’t assume that ordinary paint will automatically bond strongly to every type of plastic.
Previously Painted Parts
If the old coating is sound and compatible, preparation and suitable primer can provide a good foundation for the new finish.
Step 6: Mask the Motorcycle
If you are painting a part while it is still installed, mask aggressively.
Protect:
- Brake discs
- Brake pads
- Tyres
- Wiring
- Electrical connectors
- Rubber components
- Bearings
- Seals
- Engine openings
- Lights
- Instrument panels
- Controls
Never allow ordinary spray paint to reach brake discs or brake pads.
Brake components are safety-critical and should not be treated like cosmetic parts.
Step 7: Choose the Correct Paint
Different motorcycle parts require different types of paint.
Body Panels
A suitable automotive or multi-surface paint can be used when compatible with the panel material.
The supplied Amazon results include products such as Dulux Simply Refresh and Nippon Paint Pylox, both listed as suitable for multiple surfaces including motorcycle-related applications.
Metal Brackets and Crash Guards
For ordinary metal components, options such as Vista Auto Care or CUBE Matt Black can be considered.
High-Temperature Parts
Do not use ordinary body spray paint on a hot exhaust component.
The supplied listing includes APAR High Heat Resistant Spray Paint, which is specifically listed for high-temperature applications including silencers.
Brake Calipers
Calipers require a product specifically intended for caliper use. The supplied Amazon results include Rust-Oleum Automotive Caliper Spray Paint.
Do not confuse caliper paint with paint for brake discs or brake pads.
Step 8: Test the Spray
Before spraying the actual motorcycle part, test the can on a scrap piece of material.
Check:
- Spray pattern
- Colour
- Coverage
- Drying
- Finish
- Compatibility with the primer
This is particularly useful when combining primer, colour and clear coat from different products.
Step 9: Apply the First Coat
Shake the can thoroughly according to its instructions.
Hold it at the recommended distance from the surface and keep your hand moving.
Apply a light first coat.
Don’t try to achieve complete coverage immediately.
A heavy first coat can produce:
- Runs
- Drips
- Sagging
- Uneven texture
- Slow drying
The goal is to gradually build the coating.
Step 10: Apply Multiple Light Coats
Allow the appropriate time between coats according to the paint instructions.
Then apply another light, even coat.
Continue until the colour and coverage are consistent.
Keep the can moving rather than concentrating the spray in one location.
A useful technique is:
Start spraying → move across the part → release the spray → return for the next pass.
Overlap each pass slightly.
Step 11: Don’t Try to Fix a Run Immediately
If the paint starts running, don’t keep spraying the area.
Adding more wet paint usually makes the problem worse.
Allow it to dry properly.
Afterward, the affected area can be sanded and refinished if necessary.
Step 12: Inspect the Colour Coat
Before applying clear coat, inspect the surface carefully.
Look for:
- Runs
- Dust
- Uneven coverage
- Missed areas
- Rough texture
- Fish-eyes
- Colour differences
Fix problems at this stage rather than trying to hide them under clear coat.
Step 13: Apply Clear Coat If Required
A compatible clear coat can add another layer of protection and change the final appearance.
It can provide:
- More gloss
- Additional protection
- Better resistance to everyday handling
- A smoother finished appearance
However, check compatibility between the colour coat and clear coat.
Don’t randomly mix paint systems.
Follow the manufacturer’s instructions for recoat timing.
Step 14: Let It Cure
Dry to the touch doesn’t necessarily mean fully cured.
Give the paint the full curing time specified by the manufacturer.
Avoid immediately:
- Washing the part
- Polishing it
- Waxing it
- Installing it
- Tightening bolts against fresh paint
- Scrubbing the surface
Fresh paint can be surprisingly soft underneath even when it feels dry on top.
How to Spray Paint a Motorcycle Tank
A fuel tank is more difficult than a simple bracket or crash guard.
It is exposed to:
- Petrol spills
- UV exposure
- Scratches
- Vibration
- Weather
- Frequent handling
If repainting a tank, use a coating system designed for automotive use and suitable fuel resistance.
Remove the tank where practical and protect every opening from paint and sanding dust.
Never allow paint or debris to enter the fuel system.
For an expensive motorcycle or a complete tank colour change, professional refinishing may be worth the extra cost.
How to Paint Motorcycle Plastic Panels
Plastic panels require extra attention to adhesion.
The process is:
- Remove the panel.
- Wash and degrease it.
- Sand the existing finish.
- Remove all sanding dust.
- Apply plastic adhesion promoter if required.
- Apply compatible primer.
- Apply light colour coats.
- Allow proper drying between coats.
- Apply compatible clear coat if required.
- Allow the coating to cure fully.
Don’t skip surface preparation just because the plastic looks clean.
How to Paint a Crash Guard
Crash guards are usually relatively straightforward to repaint.
A practical process is:
- Remove the crash guard.
- Clean off grease and road grime.
- Remove rust and loose coating.
- Sand the surface.
- Degrease again.
- Apply suitable metal primer.
- Apply several light coats of colour.
- Apply compatible clear coat if required.
- Allow full curing.
- Reinstall carefully.
Keep in mind that crash guards can receive impacts and scratches during normal use. No aerosol coating will make them immune to damage.
How to Paint a Motorcycle Exhaust
Exhaust components require heat-resistant paint.
Ordinary spray paint can burn, discolour, peel or deteriorate when exposed to exhaust temperatures.
The supplied Amazon results include APAR High Heat Resistant Spray Paint, listed as a matt-black coating for applications including silencers.
The basic preparation remains similar:
- Remove the exhaust where practical.
- Clean it thoroughly.
- Remove rust and loose coating.
- Sand the surface.
- Remove dust.
- Apply the heat-resistant coating according to its instructions.
- Allow the specified curing process.
Don’t assume a normal automotive spray paint is suitable simply because it says it works on metal.
What You Should Never Spray Paint
Avoid ordinary spray paint on:
- Brake discs
- Brake pads
- Tyre tread
- Tyre sidewalls
- Grips
- Friction surfaces
- Chain components
- Electrical connectors
- Headlight lenses
- Instrument screens
- Engine intake openings
Braking surfaces are not cosmetic surfaces.
If paint accidentally contaminates a brake disc or pad, don’t rely on riding the motorcycle until it “wears off”. Clean or replace affected components as appropriate.
Common Spray-Painting Mistakes
Painting Over Grease
Problem: Poor adhesion and peeling.
Solution: Thoroughly clean and degrease before painting.
Skipping Sanding
Problem: The new coating has little mechanical grip.
Solution: Properly key the existing surface.
Using One Heavy Coat
Problem: Runs and uneven texture.
Solution: Use several light coats.
Skipping Primer
Problem: Poor adhesion or corrosion protection.
Solution: Use the appropriate primer for the substrate and paint system.
Painting in Wind
Problem: Dust and overspray land on the wet surface.
Solution: Work in a controlled, well-ventilated area.
Touching the Prepared Surface
Problem: Finger oils contaminate the surface.
Solution: Use clean gloves when handling the part.
Mixing Incompatible Paints
Problem: Wrinkling, bubbling or poor adhesion.
Solution: Follow the manufacturer’s compatibility instructions.
Rushing the Curing Process
Problem: The paint gets damaged during installation or washing.
Solution: Give it sufficient time to cure.
How Many Cans Do You Need?
There isn’t one universal answer.
Paint consumption depends on:
- Size of the part
- Number of coats
- Spray technique
- Paint coverage
- Colour
- Surface condition
- Primer coverage
- Number of parts
For a large tank or several body panels, plan for more paint than you think you need. Running out halfway through a panel can make achieving consistent coverage difficult.
Gloss vs Matt Paint
Gloss
- Shiny appearance
- Reflects more light
- Can look factory-like when properly applied
- Surface defects can be more visible
Matt
- Non-reflective appearance
- Gives a more understated look
- Can hide some minor visual imperfections
- Repairs can be harder to blend invisibly
For a matt-black motorcycle component, CUBE Matt Black Spray Paint is one of the supplied options meeting the required customer-rating threshold.
Final Verdict
DIY spray painting can work very well for motorcycle brackets, crash guards, accessories and other cosmetic components, but preparation matters more than the spray can.
Clean the part properly, remove rust and loose paint, sand the existing finish, use the correct primer and apply several light coats rather than one heavy coat.
Most importantly, choose paint according to the part. Use suitable products for plastic, metal and high-temperature components instead of treating every motorcycle part the same.
For ordinary metal and cosmetic work, the supplied Amazon options include Vista Auto Care, Nippon Paint Pylox, Dulux Simply Refresh and CUBE Matt Black. For specialised applications, use products designed specifically for calipers or high-temperature components rather than ordinary spray paint.
Top Picks for This Article
Handpicked from across DealPaglu — prices and offers may change.